
Giving feedback on content and design inside WordPress hasn’t always been easy. Teams often used Google Docs, Figma, or email threads to review drafts, leave comments, and finalize content or design before publishing. This workflow worked, but it forced teams to juggle multiple tools, copy content back and forth, and sometimes lose context along the way.
That’s starting to change. WordPress now includes a built-in way to leave feedback directly inside the editor using Notes. Instead of sending screenshots or long comment threads, you can attach feedback to specific blocks, whether it’s content, layout, or styling, right where it lives.
In this guide, you’ll learn what WordPress Notes are, how to use them and how they can simplify your workflow.
In this article
What are WordPress NotesHow to Add Notes in WordPressHow to Edit & Review Notes in WorPressHow to Enable Notes for Custom Post TypesHow to Disable Notes in WordPressWhy You Should Use Notes in WordPress
What are WordPress Notes
WordPress includes a built-in Notes feature that lets you leave feedback directly inside the editor. Each note is attached to a specific block, like a paragraph, image, or heading, so teams can review and edit content right inside the WordPress editor.
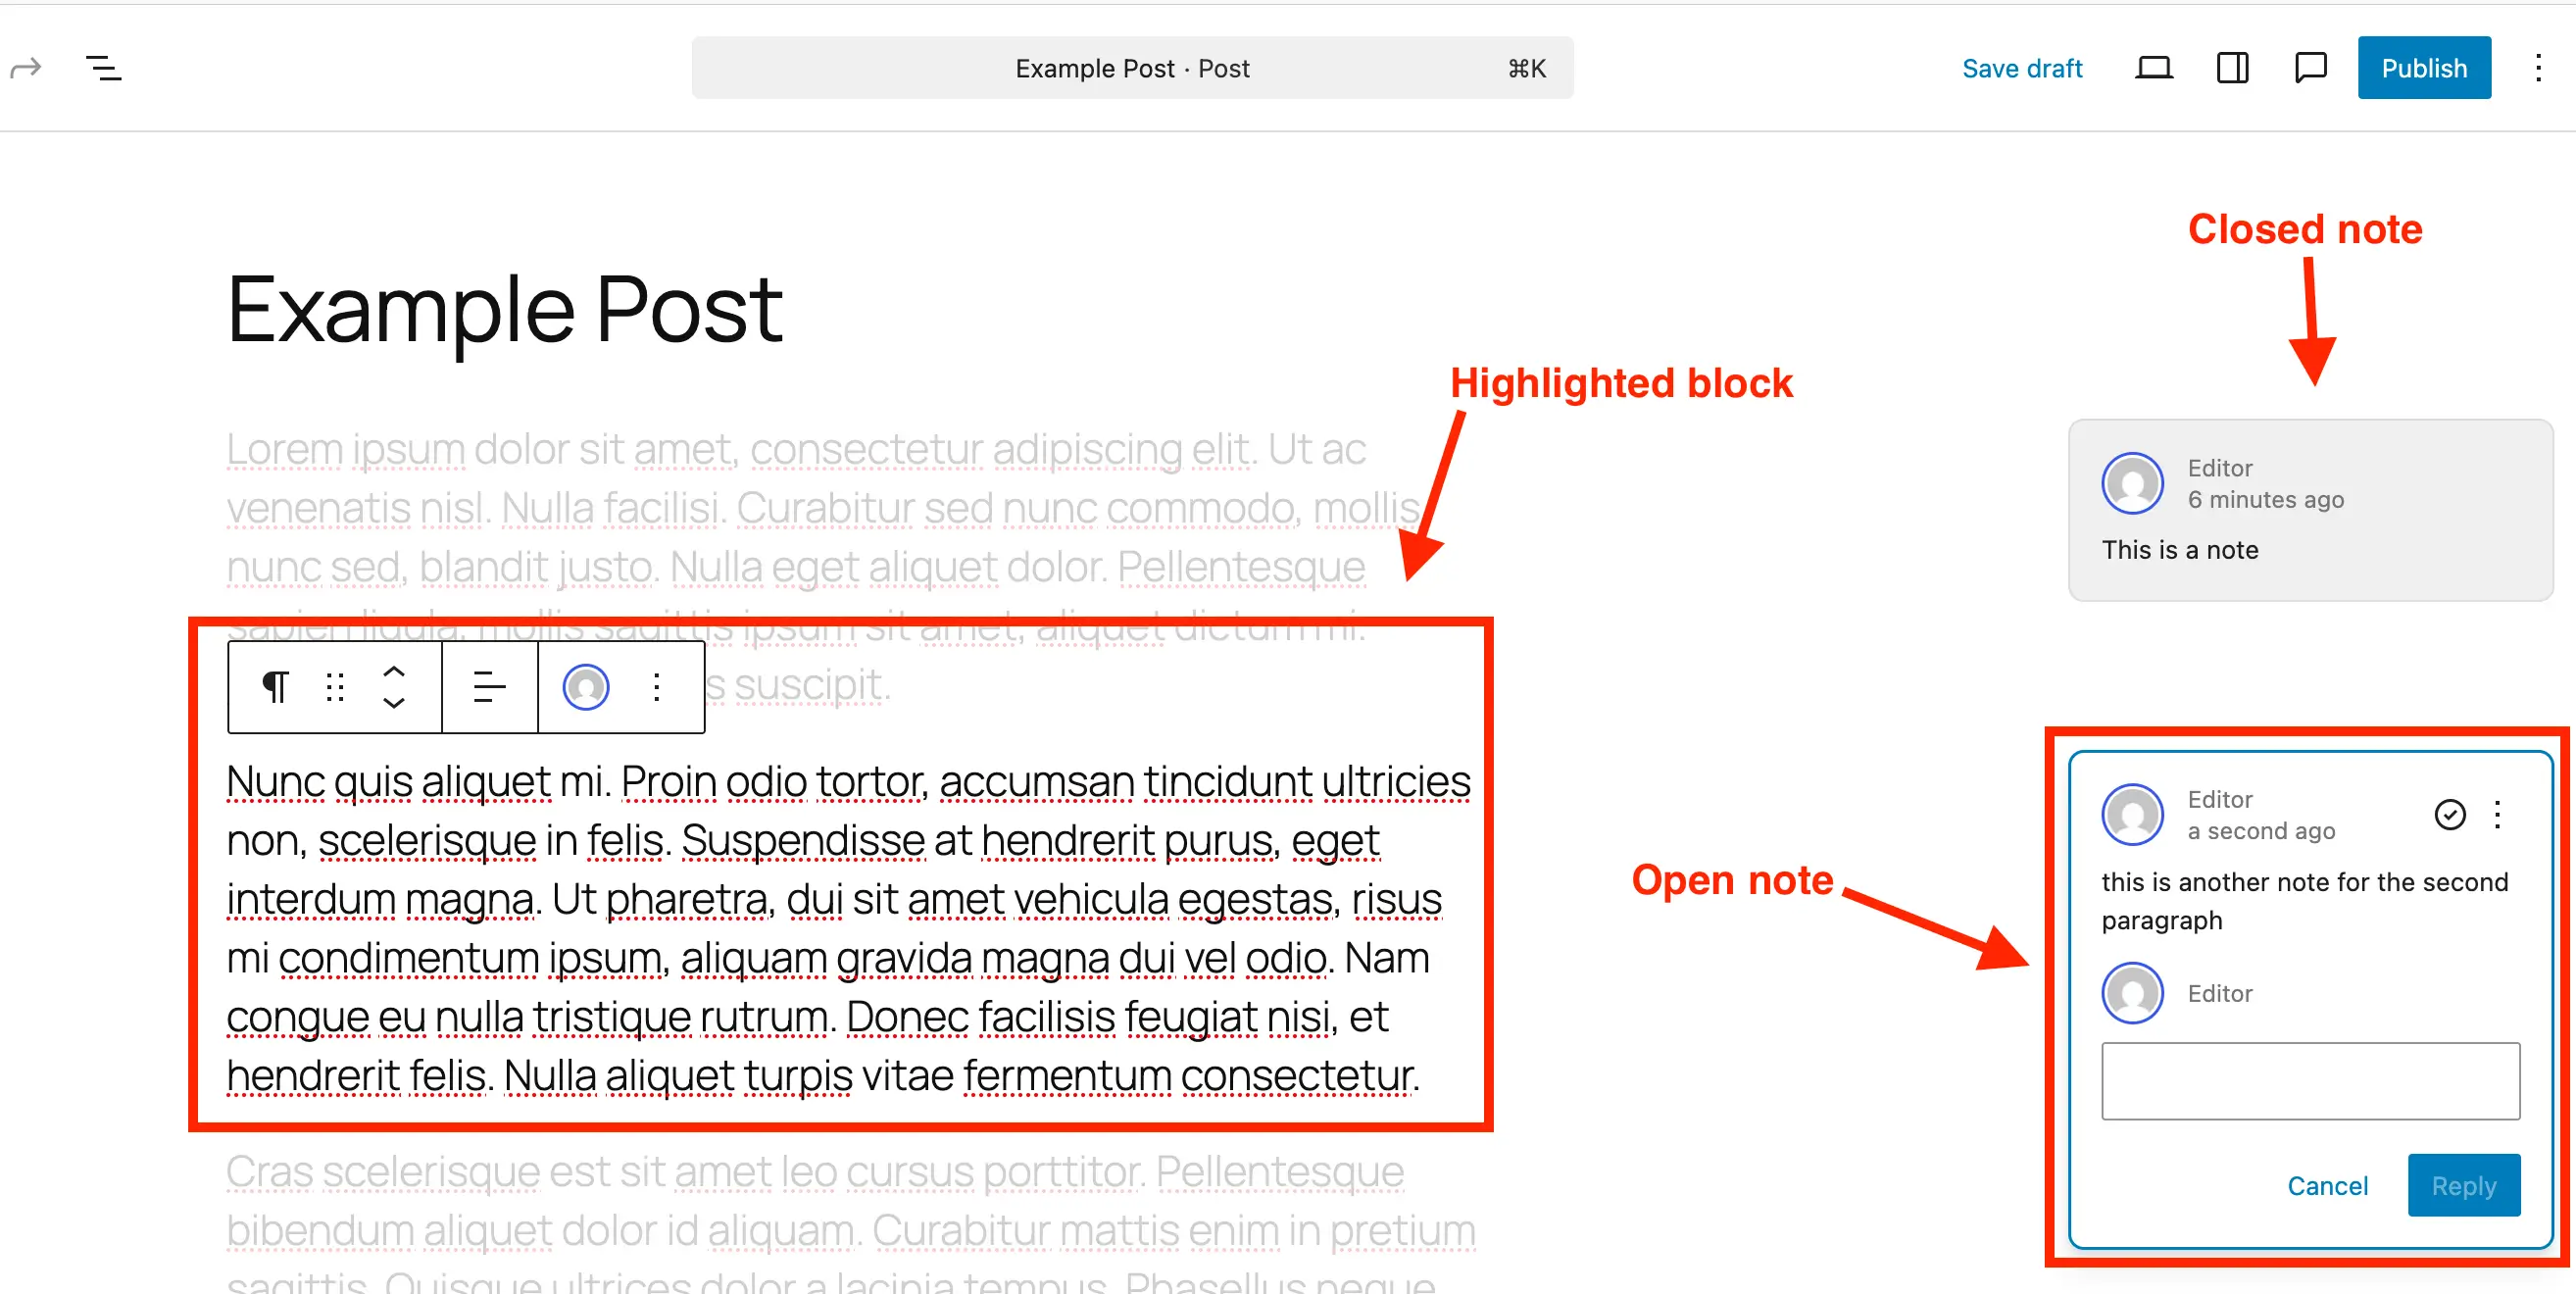
Here’s what a note looks like when added to a block in the WordPress editor:
As you can see, the note appears on the right-hand side, similar to comment bubbles, showing the note author, note date and the ability to reply directly to the note. Clicking a note highlights the related block and fades out the rest of the content, so the block being discussed really stands out. This makes it easy to focus on specific feedback and follow the conversation directly in the editor.
So basically, Notes are a way to add comments directly to your posts from inside the Gutenberg editor for editing purposes, eliminating the need for third-party tools and making collaboration with your team or clients much smoother.
Watch this quick video to see how to add, review, and resolve Notes directly in the WordPress editor, or follow along with the written guide below.
How to Add Notes in WordPress
Adding a note in WordPress is simple and intuitive. Once you know where to look, you can leave feedback directly on any block without ever leaving the editor. Below is a step-by-step guide to help you get started.
Step 1: Open the Post or Page
Go to the post or page you want to review in the WordPress block editor.
Step 2: Select the Block
Click the paragraph, heading, image or other block where you want to leave feedback.
Step 3: Add a Note
Open the block options (three-dot menu) and select Add Note. A panel will appear where you can type your feedback.

Step 4: Write and Submit Your Feedback
Once you’ve clicked the Add Note link, a box will appear on the right-hand side where you can enter your note.
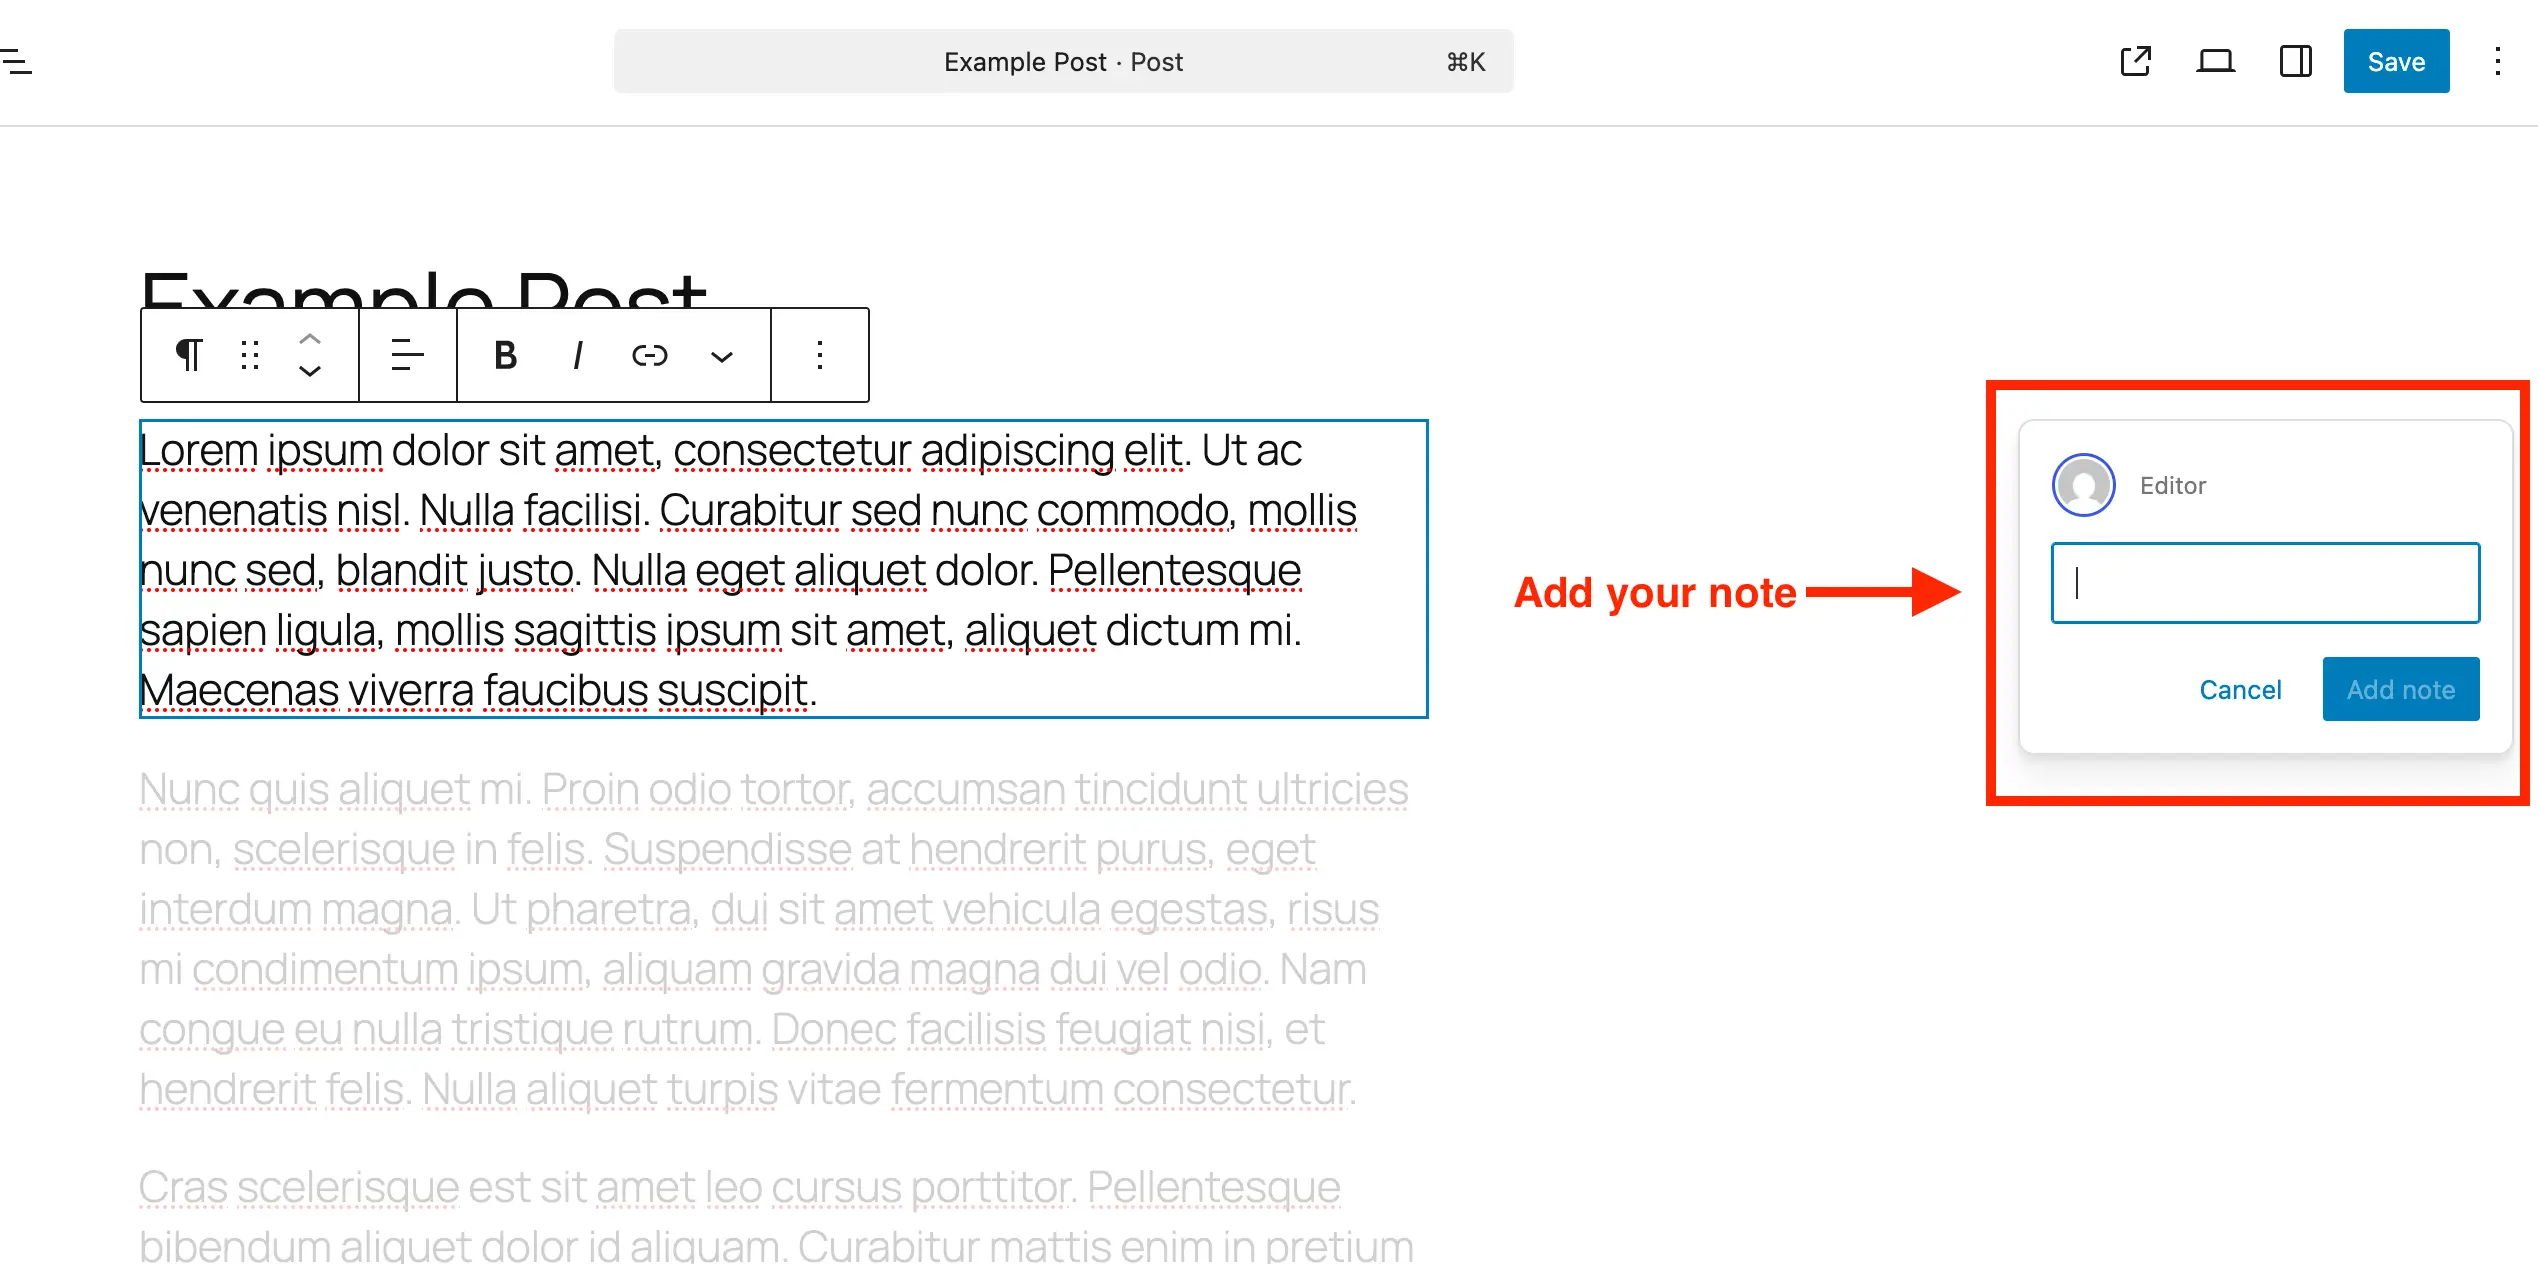
The input initially looks like a small single line, but as you type it expands automatically, and you can hit Enter to add line breaks for longer feedback.
How to Edit & Review Notes in WorPress
Once notes have been added, reviewing and managing them is just as simple. You can reply to feedback, resolve completed notes, or reopen them if further discussion is needed. Notes stay attached to their specific blocks, so it’s easy to see exactly which part of the content each comment relates to.
Open the Post or Page
Go to the post or page that contains the notes you want to review.
Toggle the Notes Side Panel
When you first open a post, WordPress displays the default settings sidebar panel. You can click to close it to see notes on the right-hand side next to their respective blocks.
However, when editing or managing notes, we recommend clicking the Notes icon (which looks like a comment bubble) in the editor toolbar to open the Notes sidebar. This sidebar stacks all notes at the top, making it much easier to review and manage feedback in one place.
Click a Note
In the Notes panel or sidebar, click the note you want to view. The related block will be highlighted, and the rest of the content will fade out to keep your focus on that feedback.
You can also click directly on any block in the editor. If a note is attached to that block, it will activate the note in the sidebar or on the right-hand side, allowing you to reply, edit or resolve it.
Reply to a Note
Type your response in the note’s reply field and click the Reply button. This keeps all discussion tied to the original feedback.
Resolve a Note
Once the feedback has been addressed, click Resolve (check icon) to mark the note as complete. After resolving, the note will no longer appear on the right-hand side when all sidebar panels are closed. However, it will still be visible in the Notes panel, allowing you to see both open and resolved notes.

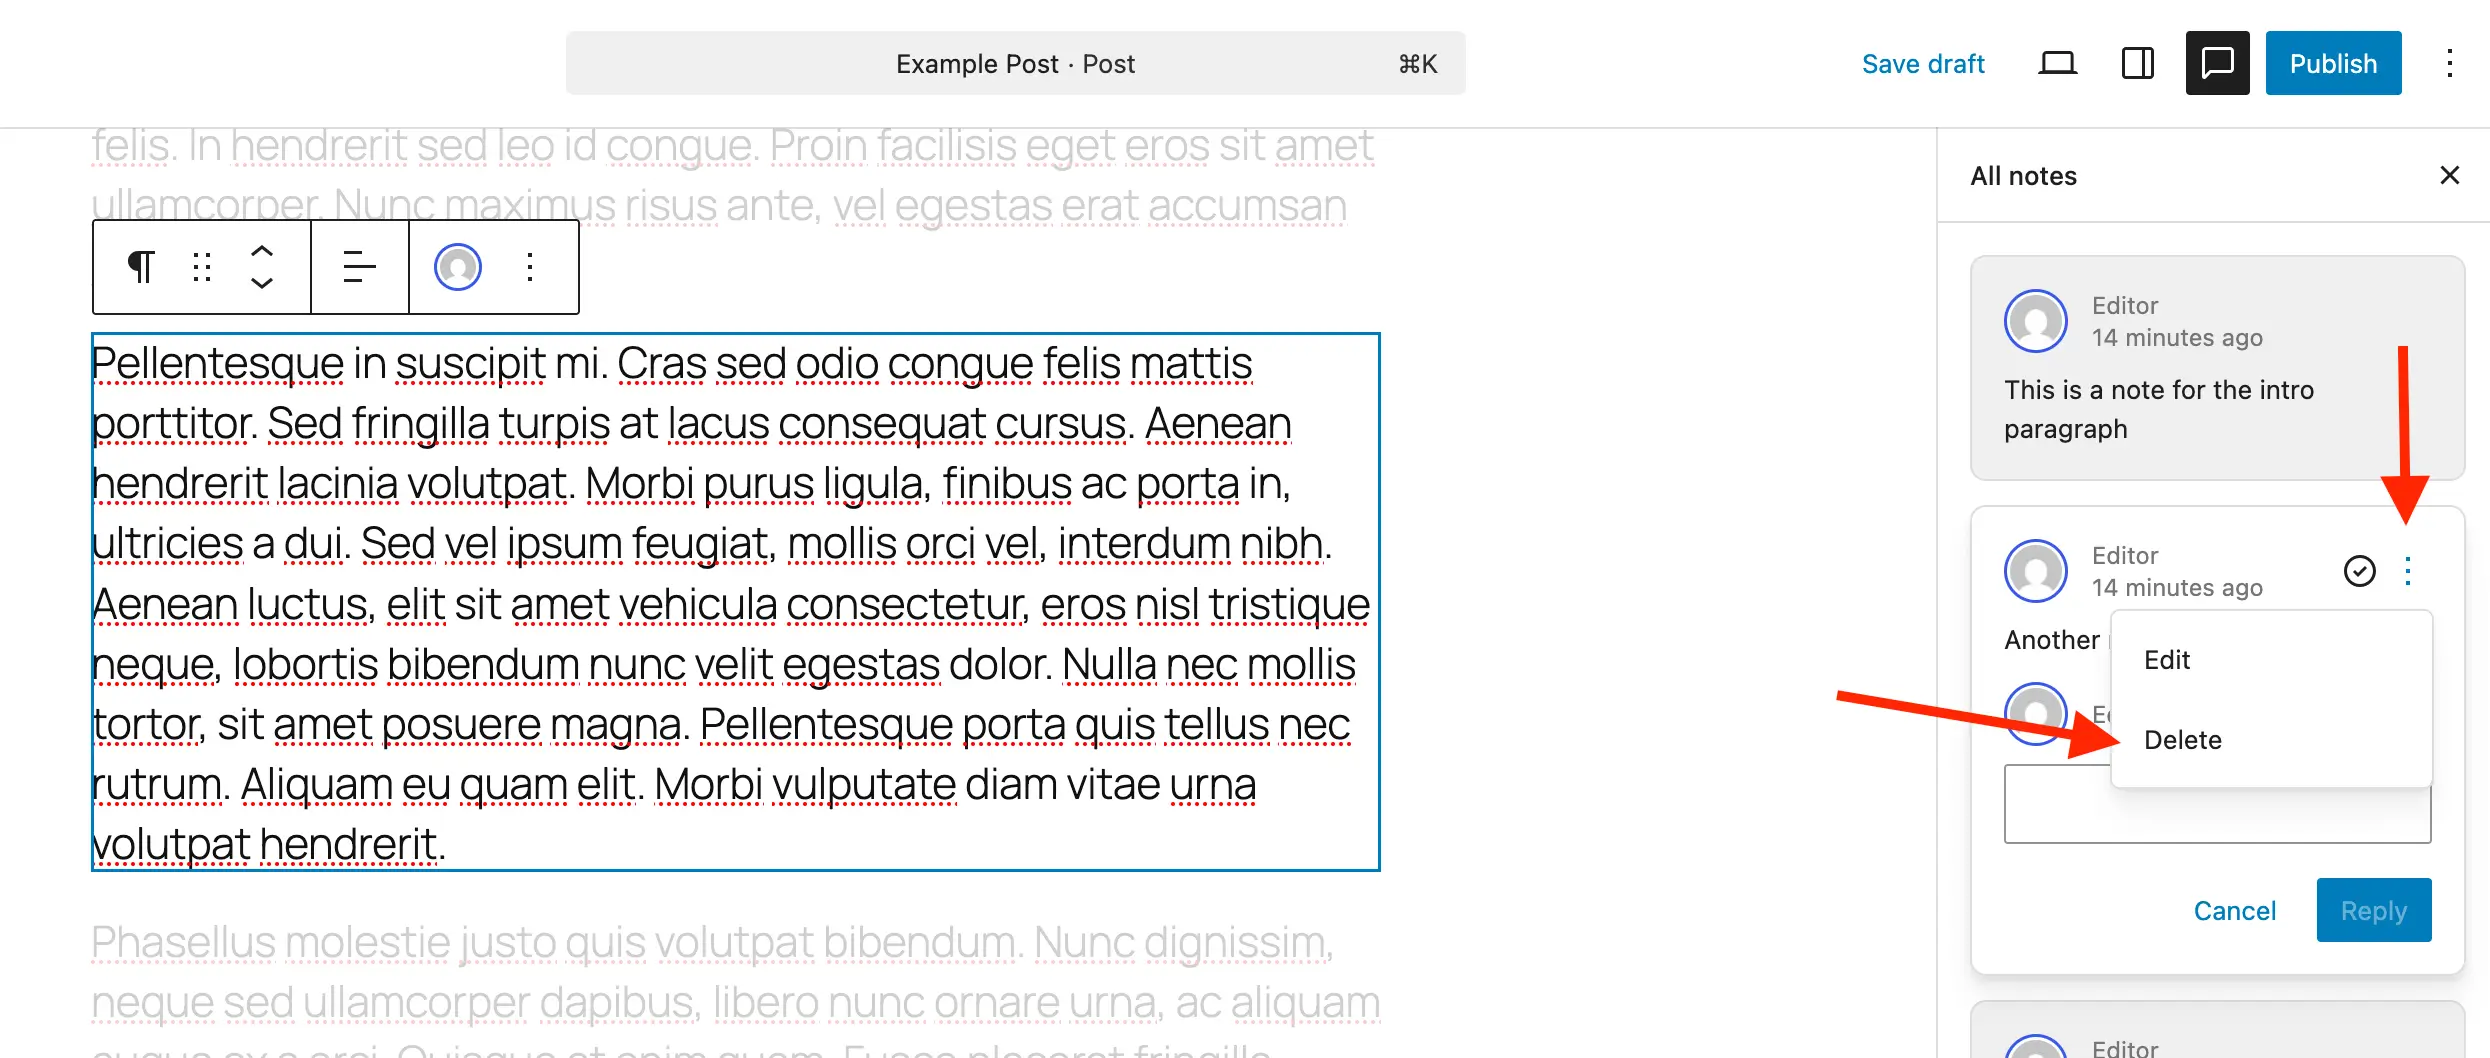
Delete a Note
You can remove a note from the post completely by clicking the three-dot menu on the note and selecting Delete instead of resolving it.
We recommend deleting resolved notes once they are no longer needed. This helps keep your database as slim as possible, which can be especially important on very large sites.
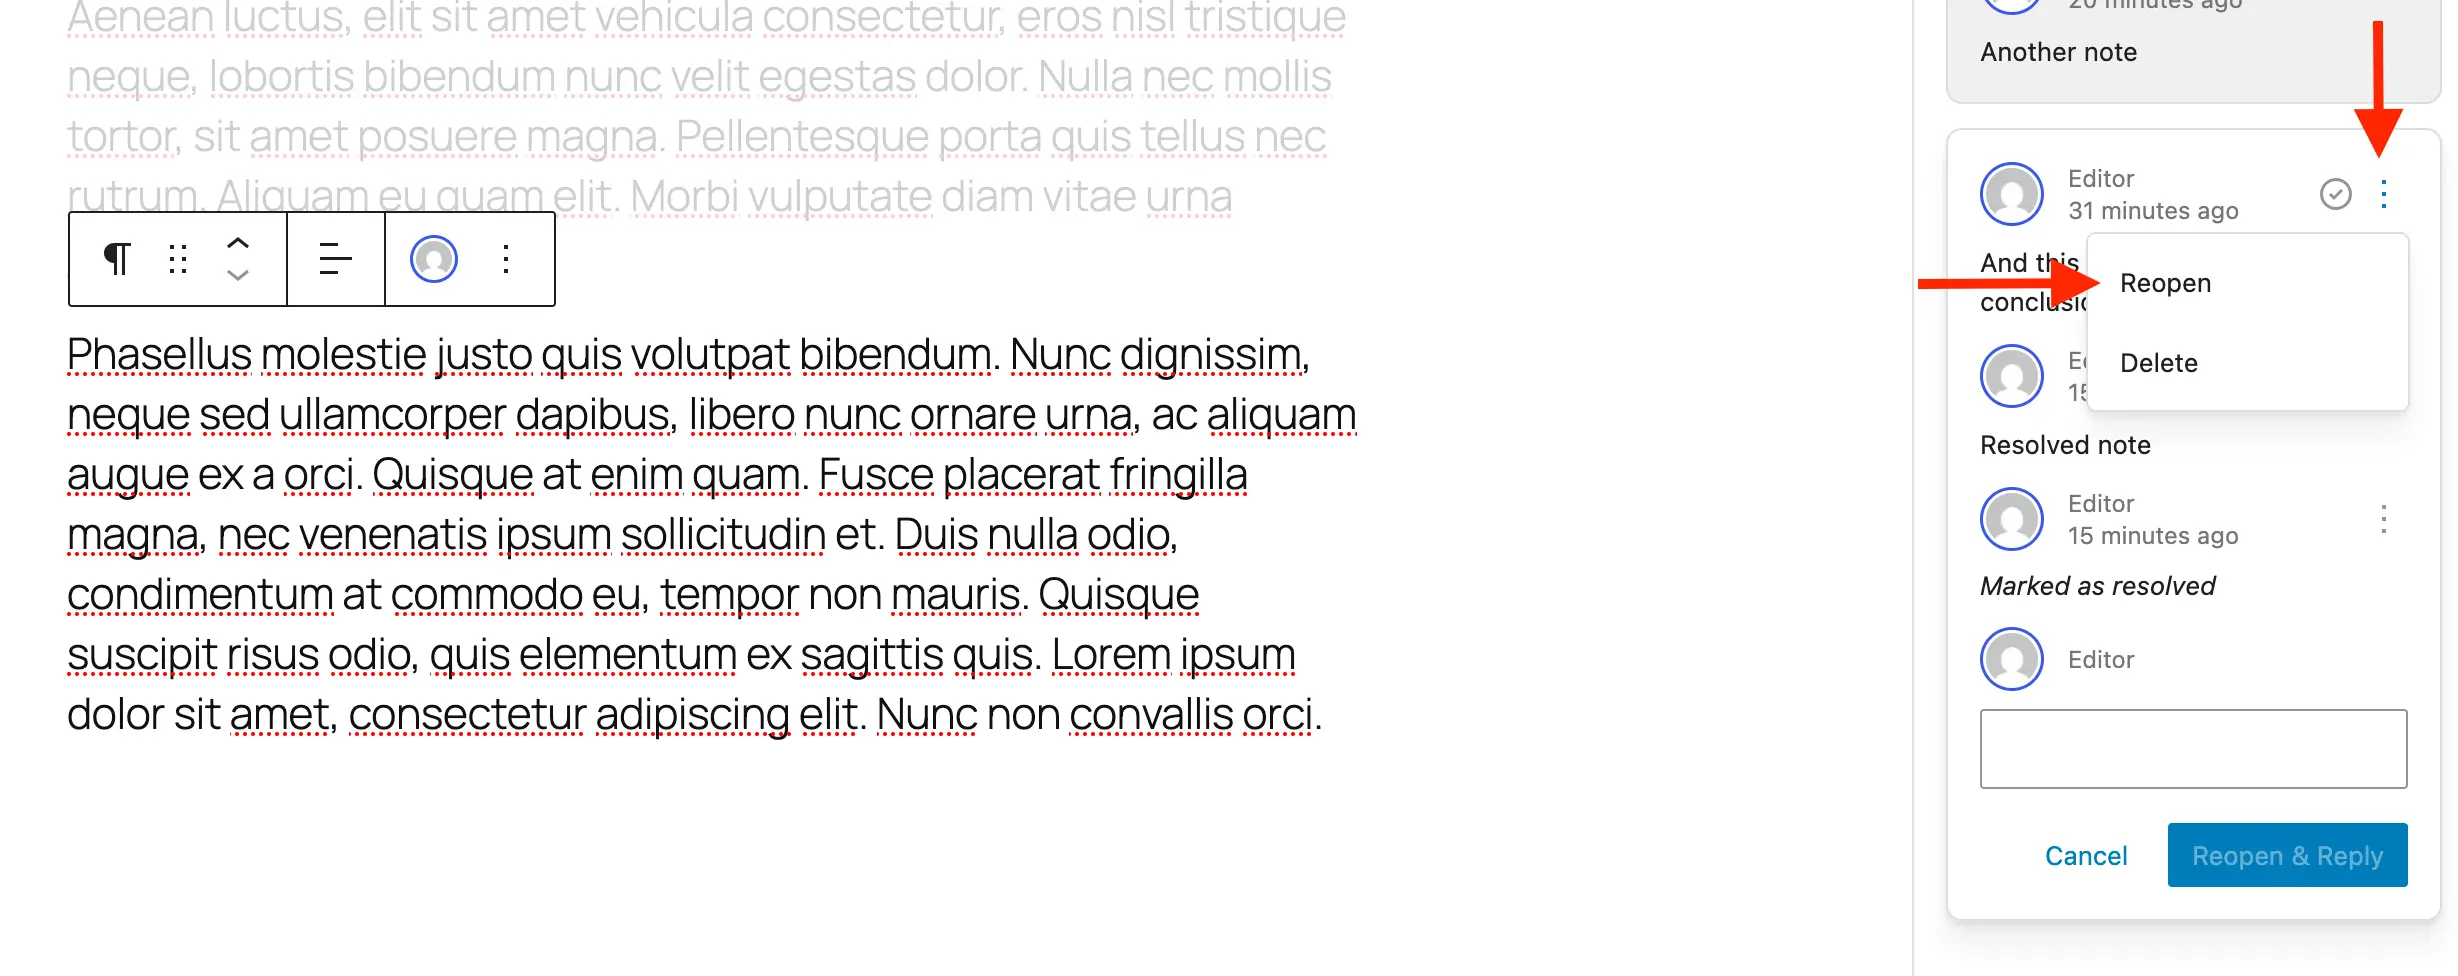
Reopen a Note
If you need to reopen a note, click the three-dot menu on the note and select Reopen.
How to Enable Notes for Custom Post Types
By default, WordPress enables Notes for standard posts and pages. To use Notes with a custom post type, you need to add them as part of the block editor support.
If you use our Post Types Unlimited plugin to register your post types (which we recommend), you can simply check the box next to Notes in the Supports settings. Otherwise, you’ll need to enable support by adding it when registering your custom post type with code or by using a snippet to add it to an existing post type.
Enable Notes When Registering a Custom Post Type
When registering a new custom post type manually, include “notes” => true in the editor parameter under the supports argument. For example:
register_post_type( ‘book’, [
‘label’ => ‘Books’,
‘public’ => true,
‘show_in_rest’ => true,
‘supports’ => [
‘title’,
‘editor’ => [ ‘notes’ => true ], // !!! ADD THIS !!!
‘author’,
],
] );
Enable Notes on an Existing Custom Post Type
If your custom post type already exists, merge Notes into the existing editor supports to keep other editor features intact:
/**
* Enable editor notes for custom post types.
*/
add_action( ‘init’, function() {
$post_types = [ ‘MY_POST_TYPE_1’, ‘MY_POST_TYPE_2’ ];
foreach ( $post_types as $post_type ) {
$supports = get_all_post_type_supports( $post_type );
$editor_supports = array( ‘notes’ => true );
if ( is_array( $supports[‘editor’] ) && isset( $supports[‘editor’][0] ) && is_array( $supports[‘editor’][0] ) ) {
$editor_supports = array_merge( $editor_supports, $supports[‘editor’][0] );
}
add_post_type_support( $post_type, ‘editor’, $editor_supports );
}
} );
Simply modify the $post_types array so it contains a list of the post types you wish to enable Notes for.
How to Disable Notes in WordPress
If you don’t want Notes appearing on certain posts or pages, you can disable them quickly. Hiding unused Notes helps reduce visual clutter in the editor. WordPress doesn’t provide a global setting to turn off Notes entirely, but you can remove them from specific post types so the feature isn’t available where you don’t need it.
Use this snippet to remove Notes from posts and pages:
/**
* Disable Notes via post type args filter.
*/
add_filter( ‘register_post_type_args’, function( $args, $post_type ) {
$post_types = [ ‘post’, ‘page’ ];
if ( in_array( $post_type, $post_types, true ) && isset( $args[‘supports’][‘editor’][‘notes’] ) ) {
unset( $args[‘supports’][‘editor’][‘notes’] );
}
return $args;
}, 10, 2 );
Edit the snippet and remove post or page from the $post_types array if you wish to keep Notes enabled for one of them.
Why You Should Use Notes in WordPress
Notes help you keep your content workflow organized and feedback centralized. Teams, editors, designers and clients can leave, review, and resolve notes directly on specific blocks without leaving the editor. This eliminates the need for external tools and makes tracking changes simple and efficient.
Using Notes in WordPress helps you:
Streamline collaboration across writers, editors, and designers.
Track feedback and revisions directly on the relevant block.
Leave notes on content, styling, typography, and layout (not just text).
Manage approvals faster and more effectively.
By incorporating notes into your editing process, you can simplify communication, improve productivity, and ensure every piece of content and design element benefits from clear, actionable feedback. Whether you’re collaborating with a team or reviewing your own work, notes make editing and design review smoother, more focused, and more efficient.